-
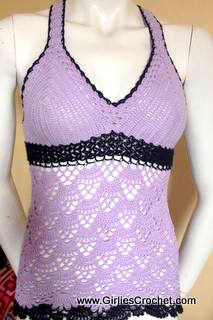
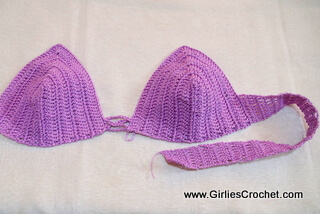
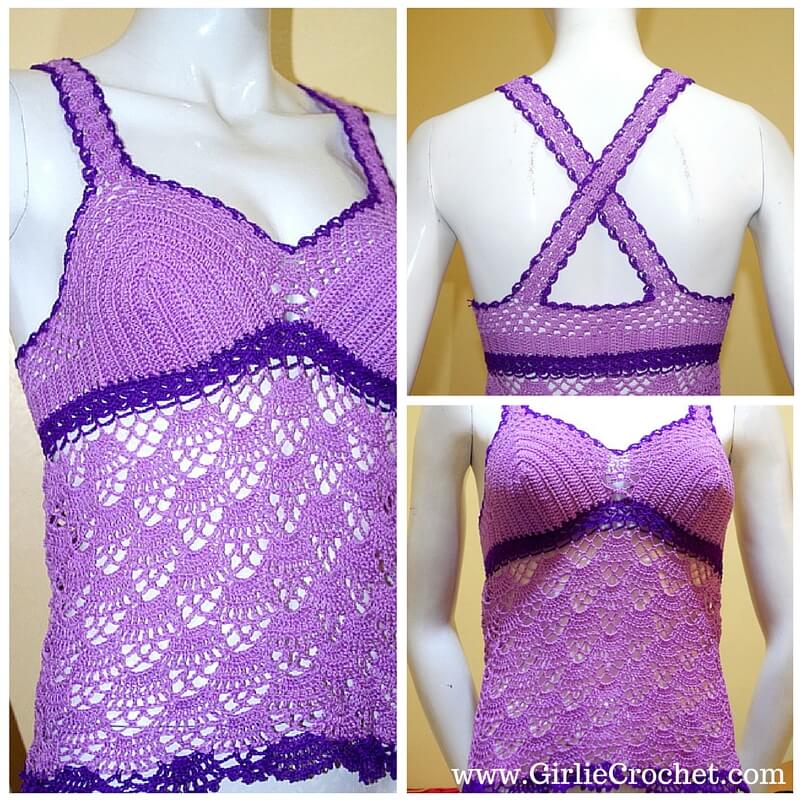
Bea Tank Top

Bea Tank Top is a vibrant top for the casual summer outing. The light and airy design makes it an ideal cover up to your bathing suit and at the same time can be worn as a casual blouse. This free crochet pattern is easy to create with minimal effort with step by step instructions and photo tutorials.


This Bea Tank Top can fit size Small only (34") with cup B or C
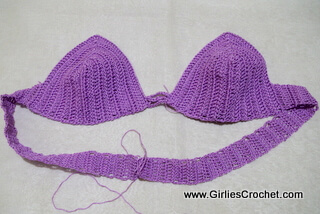
This tank top is worked 2 cups separately then joined to each other, then cup side to back then joined to conform to body, then under cup (bodice) to hem, then shoulder strap to edging.
Laying flat measurements from top of cup to hem is 17", and width under the cup is 15".
This Bea Tank Top is a combination of 2 strands held together for the cup and 1 strand for the rest of the pattern, but using the same hook through out the pattern.
A Little Background on how I created this design.
This picture is the one I created using our local thread here in the Philippines.
Thank's to Crochet Lover in the Philippines community I created this tank top using the given stitches during a challenge.
When I posted this in other groups it became popular and from then on, I started to create the design in my mind and how to put it into writing.
My goal is to create in S, M, and L sizes. But this time, I used Aunt Lydia's thread #10 which is finer than our local thread. Now my dilemma is, when I was creating this into another thread brand. I could not get the exact design that's in my mind.
This is for all of you who will ask if I could make for other sizes. But I think, this is not the right thread for other sizes. It will take a longer time, a lot of threads and a lot of boring hours.
So, please be patient I will post another pattern with this design but this time, I will use, maybe Aunt Lydia's #3 so it will be easy for all of us to finish this project. And so that even beginners can do this project. It is the goal of www.girliescrochet.com to teach and encourage other's how to crochet in an easy and fun way.
Happy Crocheting Everyone!!!
Materials Needed:
Stainless Hook: 2 / 2.25 MM and
Thread: Aunt Lydia’s Crochet Thread Classic #10;
Wood Violet - 2 balls ; Purple - 1 Ball
Terms Used:
All terms are in USA terminology
Ch: Chain, Sc: Single Crochet, Dc: Double Crochet,
Hdc: Half Double Crochet, Sl st: Slip Stitch, Rem: Remaining,
Bet: Between, WS: Wrong Side, RS: Right Side
Gauge:
2" - 14 Stitches x 2" - 6 Rows of Dc's (Single strand)
or
Pattern cup round 1-6 wide is 2" (Double strand)
Stitch Guide:
Dc-trc tog: Yarn over the hook, draw up a loop in next dc, yarn over the hook, draw through first 2 loops on hook, (yarn over the hook) twice, draw up a loop in next dc, yarn over the hook, (draw through first 2 loops on hook) twice, yarn over the hook, draw through all 3 loops on hook:
dc-trc tog made.
Dc2tog: (Yarn
over the hook, draw up a loop in next dc, yarn over the hook, draw through
first 2 loops on hook) 2 times, yarn over the hook, draw through all 3 loops on
hook: dc2-tog made.
Sc2tog: Draw up a loop in each of next 2 sts, yarn over the hook and draw through all 3 loops on hook: Sc2tog made.
Picot: Ch3, sl st in top of dc. Photo Tutorial here.
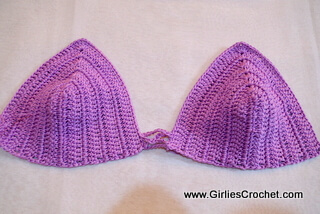
Bea Tank Top - Cup Instructions:
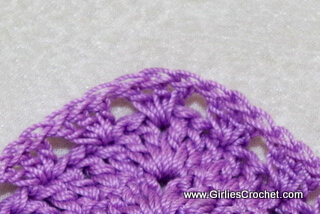
First Cup: Using wood violet thread, double strands held together.
Row 1: Ch 20, dc in 5th ch from hook, dc in each sts across,
in last st work 3dc-ch1-3dc, continue to other side, dc in each sts across. [38 dc]

Row 2: Ch 3 (consider as 1st dc), turn, dc in each sts across, 2dc-ch1-2dc in next 1ch sp, continue to other side, dc in each sts across. [42 dc]
Row 3: Repeat row 2, but this time having total of 46 dc.
Row 4: Repeat row 2, but this time having total of 50 dc.
Row 5: Repeat row 2, but this time having total of 54 dc.
Row 6: Repeat row 2, but this time having total of 58 dc.
Row 7: Repeat row 2, but this time having total of 62 dc.
Row 8: Repeat row 2, but this time having total of 66 dc. First Cup, fasten off.
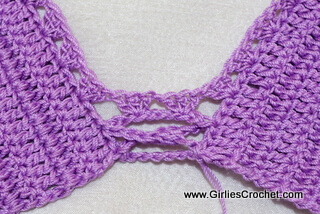
Second Cup: Using wood violet thread, double strands held together.
Row 1-8: Repeat row 1-8 of first cup instructions,
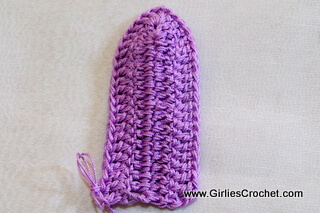
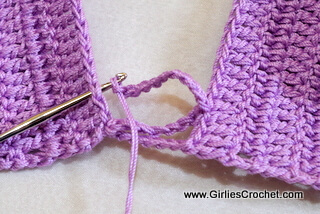
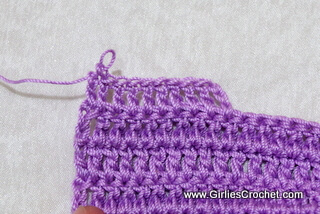
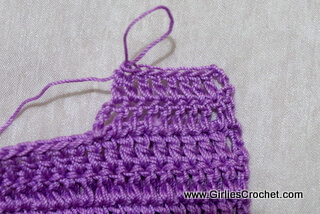
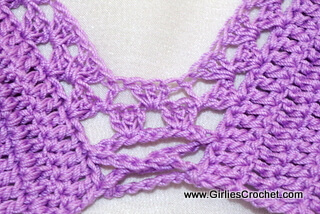
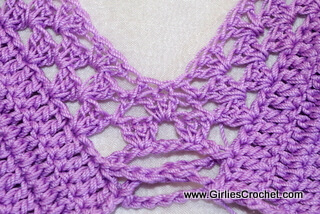
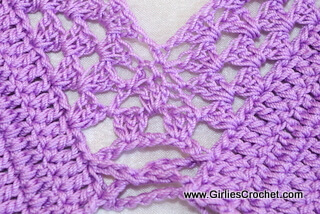
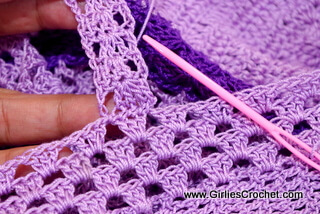
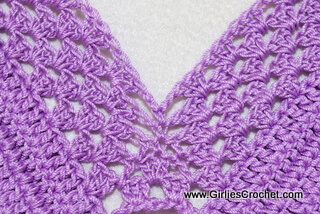
Now we attach the other cup, ch 6, turn, drop the thread (Pic 1), insert hook on corner of first cup, grab the thread, ch 9, drop the thread, in second cup, sk 2 dc, insert hook in next dc, grab the thread (Pic 2),
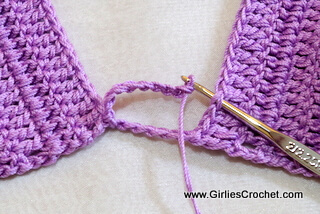
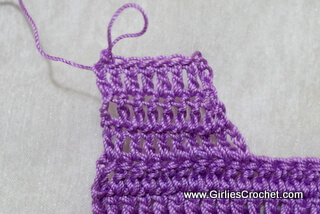
ch 11, drop the thread, sk 2 dc of previous cup, insert hook in next dc, grab the dropped thread (Pic 3), ch4, sk next 4 ch of 9 ch sp, sl st in next ch, ch 4, drop the thread, insert hook in corner of second cup (Pic 4), grab the thread, sl st, fasten off.
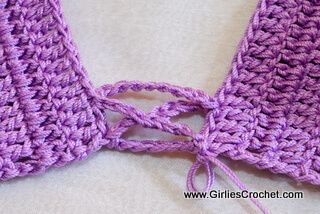
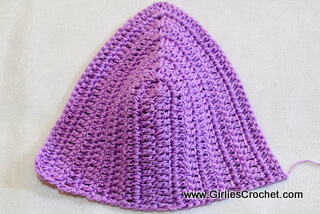
Right Side (RS): This is what it looks like for your Right Side (rs)
Second Cup side part: Using wood violet thread, single thread.
Row 9: Attach thread on the right side of second cup, ch 3 (consider as 1st dc), turn, dc in each of next 9 sts.
Row 10: Ch 3 (consider as 1st dc), turn, dc in each of next 6 sts, dc2tog.
Row 11: Ch 3 (consider as 1st dc), turn, dc in each of next 7 sts.
Row 12-41: Repeat row 11. Cut off.
First Cup side part: Using wood violet thread, single thread.
Row 9: Attach thread on the left side lower corner of first cup, ch 3 (consider as 1st dc), turn, dc in each of next 7 sts, dc-trc tog.
Row 10: Ch 2, turn, dc in each of next 8 sts.
Row 11: Ch 3 (consider as 1st dc), turn, dc in each of next 7 sts.
Row 12-41: Repeat row 11, sl st in row 41 of previous cup. Cut off.
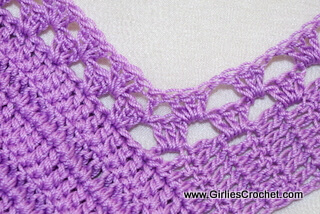
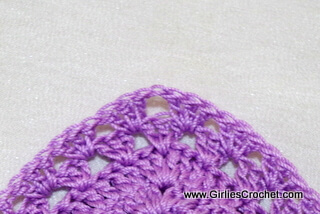
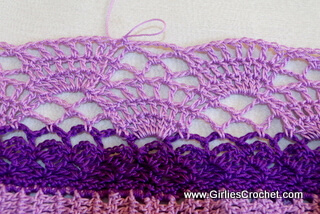
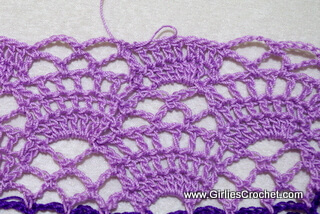
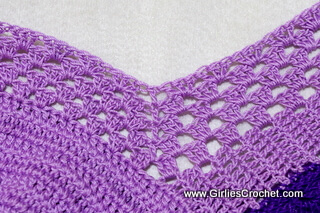
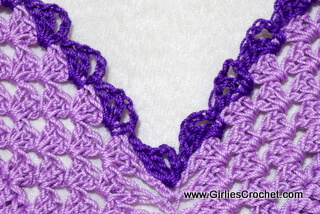
Upper Cup -Edging Instructions:
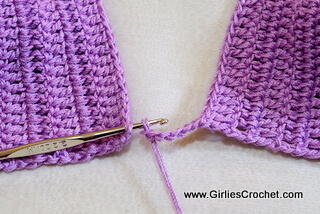
RS facing you, attach wood violet thread in the upper side of dc post right after the joined st at the back part of the top using single strand.
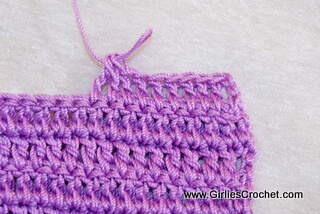
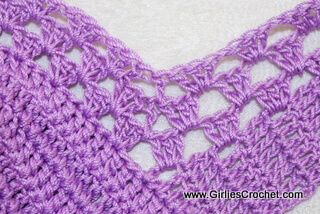
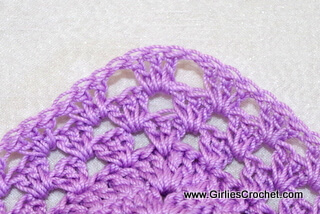
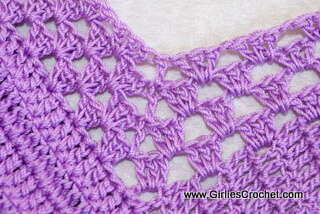
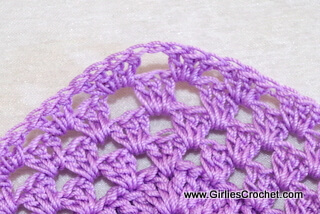
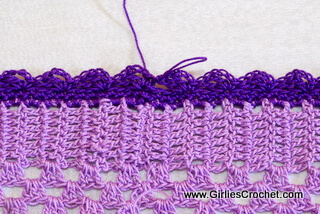
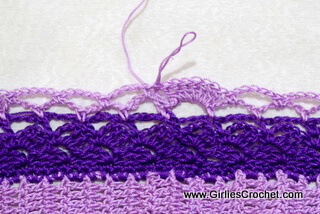
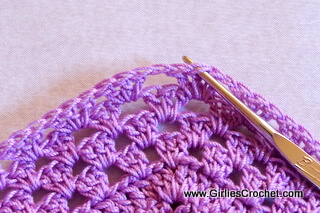
Row 1: Ch 3 (consider as 1st dc), 2dc in the same dc post (Pic 5), ch1, *3dc in next dc post, ch1, sk next dc post*, rep *to* 16 times, sk next 2dc of next cup, **3dc in next dc post, sk next 2 dc**, rep **to** 7 times (Pic 6),
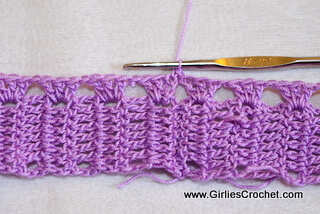
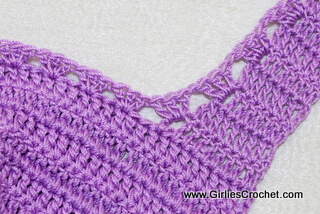
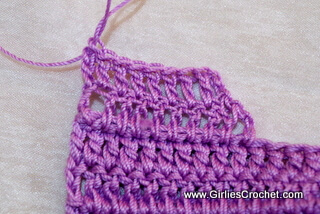
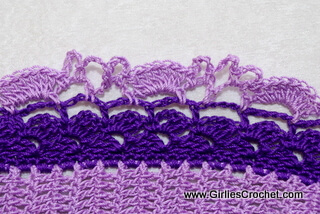
ch 1, 3dc in next 1 ch sp, ch 1, sk next 2 dc (Pic 7), rep **to** 9 times, sk next 3 ch of next 11 ch sp, (3dc in next ch, sk next 3 ch) twice, sk next 2 dc (Pic 8), rep **to** 9 times, ch 1, 3dc in next 1 ch sp, ch 1, sk next 2 dc, rep **to** 7 times, ch1, rep *to* 15 times, 3dc in next dc post, sc in top of 1st dc to join (Pic 5).
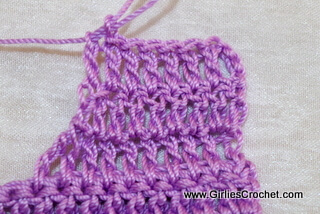
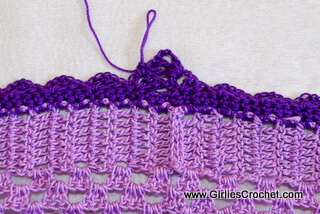
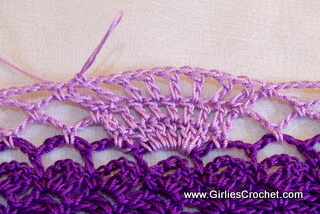
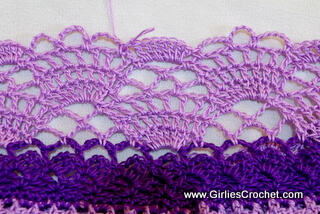
Row 2: Ch 3 (consider as 1st dc), 2dc in the same sc post (Pic 9), *ch1, sk next 3dc, 3dc in next 1ch sp*, rep *to* 16 times, dc in next sp (bet 2- 3dc's ; Pic 10), sk next 3dc, **3dc in next sp, sk next 3 dc**, rep **to** 7 times,

ch1 (Pic 11), rep **to** 9 times, (dc in next sp, sk next 3dc, 3dc in next sp, sk next 3dc) twice (Pic 12), rep **to** 8 times, ch1 (Pic 11), rep **to** 7 times, dc in next sp, sk next 3dc, 3dc in next 1ch sp, sk next 3dc, rep *to* 15 times, sc in top of 1st dc to join (Pic 9),
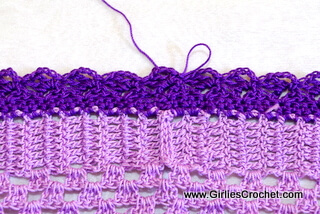
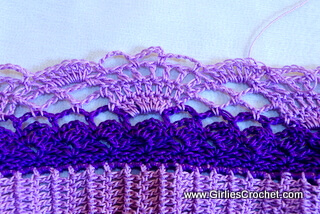
Row 3: Ch3 (consider as 1st dc), 2dc in the same sc post (Pic 13), *ch1, sk next 3dc, 3dc in next 1ch sp*, rep *to* 16 times, dc in next dc (Pic 14), sk next 3dc, **3dc in next sp, sk next 3 dc**, rep **to** 6 times,
ch1, sk next 3dc, 3dc in next sp, ch1, sk next 3dc, (Pic 15), rep **to** 8 times, dc in next dc, sk next dc, sc in next dc, sk next dc, dc in next dc (Pic 16), sk next 3dc, rep **to** 8 times, ch1, sk next 3dc, 3dc in next sp, ch1, sk next 3dc, (Pic 15), rep **to** 6 times, dc in next sp, sk next 3dc, 3dc in next sp, rep *to* 14 times, ch1, end w/ sl st in 1st dc to join.(Pic 13)
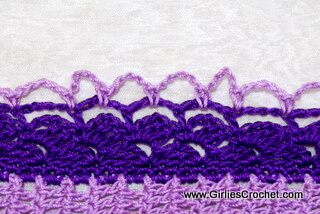
Row 4: Sl st in next 2 sts and next sp, ch3 (consider as 1st dc), 2dc in the same sp, *ch1, sk next 3dc, 3dc in next 1ch sp*, rep *to* 15 times, dc in next dc (Pic 17), sk next 3dc, **3dc in next sp, sk next 3 dc**, rep **to** 6 times,
ch1, sk next 3dc (Pic 18), rep **to** 8 times, ch1, sk next 3dc set and dc, sc in next sc, sk next dc and 3dc set (Pic 19), rep **to** 8 times, ch1, sk next 3dc (Pic 18),rep **to** 6 times, dc in next dc, sk next 3dc, 3dc in next sp, rep *to* 14 times, ch1, end w/ sl st in 1st dc to join. Cut off.
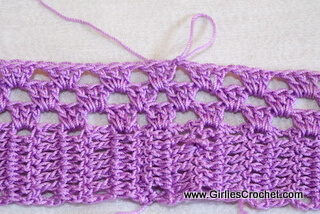
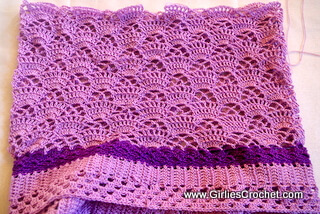
Bodice Instructions - Hem
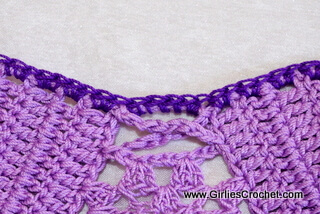
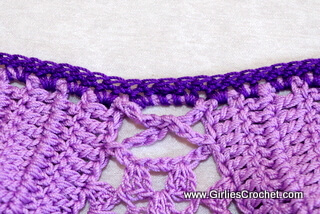
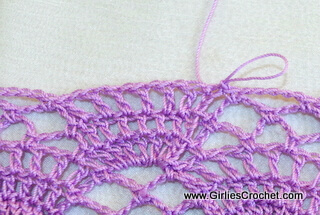
Right Side facing you, attach purple thread in dc post right after the joined st at the back part using single strand.
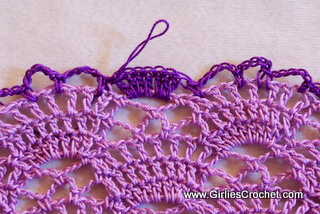
Round 1: Ch1, 2sc in the same dc post, *2sc in next dc post*, rep *to* across all dc post, 5sc in 6ch sp (middle), rep *to* across all dc post, end w/ sl st in 1st sc to join. [201 sc]
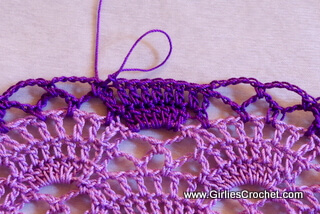
Round 2: Ch 1, turn, sc in the same st, *sc in next sc*, rep * across all dc post, sc2tog in middle bet two cups, rep *to* across all dc post, end w/ sl st in 1st sc to join. [200 sc]
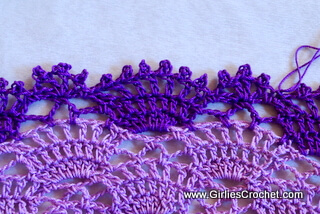
Round 3: Ch 1, sc - ch3 - 2dc in the same st, sk next 3 sts, *sc - ch3 - 2dc in next st, sk next 3 sts, rep * around, end w/ sl st in 1st sc to join. [50- 3dc sets]
Round 4: Sl st in next dc post, turn, ch1, sc - ch3 - 2dc in the same dc post, sk next 2dc, *sc - ch3 - 2dc in next dc post, sk next 2dc, rep * around, end w/ sl st in 1st sc to join. [50- 3dc sets]
Round 5: Ch 6 (ch2 consider as 1st hdc and ch4 as sp), turn, sk next 3dc, hdc in next sc, *ch4, sk next 3dc, hdc in next sc, rep * around, end w/ sl st in 1st hdc to join. [50 loops]
Round 6: Using single strand, change color to wood violet, ch1, sc in the same st, (Ch 5, sk next 4ch sp, sc in next st) 11 times, Ch 5, (sc in next 4ch sp, ch5, sk next sc) twice, sc in next 4ch sp, Ch 5, sc in next st, (Ch 5, sk next 4ch sp, sc in next st) 20 times, Ch 5, (sc in next 4ch sp, ch5, sk next sc) twice, sc in next 4ch sp, Ch 5, sc in next st, (Ch 5, sk next 4ch sp, sc in next st) 13 times, end w/ sl st in 1st sc to join. [52 loops]
Round 7: Sl st in next 4ch sp, ch1, sc in the same sp, [(Ch 5, sc in next 5ch sp) 3 times, 7dc in next 5ch sp, sc in next 5ch sp] twice, (Ch 5, sc in the same sp, Ch 5, sc in next 5ch sp, Ch 5, sc in the same sp, 7dc in next 5ch sp, sc in next 5ch sp) twice, rep [ ] 4 times, rep ( ) twice, rep [ ] twice, end w/ sl st in 1st sc to join. [12 - 7dc' set]
Round 8: Sl st in each of next 2 sts of next 5ch sp, ch1, sc in the same sp, (ch5, sc in next 5ch sp) twice, dc in each of next dc's, * sc in next 5ch sp, (ch5, sc in next 5ch sp) twice, dc in each of next dc's, rep * around, end w/ sl st in 1st sc to join.


Round 9: Sl st in each of next 2 sts of next 5ch sp, ch1, sc in the same sp, ch5, sc in next 5ch sp, *dc in each of next dc with ch 1 in between, sc in next 5ch sp, ch5, sc in next 5ch sp, rep * around, end w/ sl st in 1st sc to join.
Round 10: Sl st in next 5ch sp, ch 3 (consider as 1st dc), 6dc in the same sp,* sk next dc, sc in next 1ch sp, ch5, sk next dc- 1ch sp - dc, sc in next 1ch sp, ch5, sk next dc, sc in next 1ch sp, ch5, sk next dc- 1ch sp - dc, sc in next 1ch sp, 7dc in next 5ch sp, rep * around, sk next dc, sc in next 1ch sp, ch5, sk next dc- 1ch sp - dc, sc in next 1ch sp, ch5, sk next dc, sc in next 1ch sp, ch5, sk next dc- 1ch sp - dc, sc in next 1ch sp, end w/ sl st in 1st dc to join.
Round 11: Ch 3 (consider as 1st dc), (dc in next dc) 6 times, sc in next 5ch sp, (ch5, sc in next 5ch sp) twice, *dc in each of next dc's, sc in next 5ch sp, (ch5, sc in next 5ch sp) twice, rep * around, end w/ sl st in 1st dc to join.
Round 12: Ch 4 (consider as 1st dc and 1ch sp), dc in next dc with ch 1 in between, sc in next 5ch sp, ch5, sc in next 5ch sp, *dc in each of next dc with ch 1 in between, sc in next 5ch sp, ch5, sc in next 5ch sp, rep * around, end w/ sl st in 1st dc to join.
Round 13: Ch 1, sk next dc, sc in next 1ch sp, ch5, sk next dc- 1ch sp - dc, sc in next 1ch sp, ch5, sk next dc, sc in next 1ch sp, ch5, sk next dc- 1ch sp - dc, sc in next 1ch sp, *7dc in next 5ch sp, sk next dc, sc in next 1ch sp, ch5, sk next dc- 1ch sp - dc, sc in next 1ch sp, ch5, sk next dc, sc in next 1ch sp, ch5, sk next dc- 1ch sp - dc, sc in next 1ch sp, rep * around, 7dc in next 5ch sp, end w/ sl st in 1st sc to join.
Row 14 to hem: Repeat round 8 - round 13 to your desired length.
End with round 12, continue to hem, change color to purple
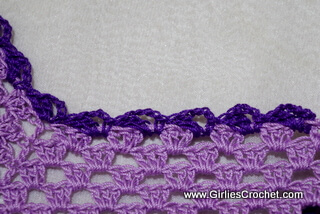
Hem Edging
Round 1: Using purple thread, Ch 1, sc in the same sp, ch5, sk next dc- 1ch sp - dc, sc in next 1ch sp, ch5, sk next dc, sc in next 1ch sp, ch5, sk next dc- 1ch sp - dc, sc in next 1ch sp, *7dc in next 5ch sp, sk next dc, sc in next 1ch sp, ch5, sk next dc- 1ch sp - dc, sc in next 1ch sp, ch5, sk next dc, sc in next 1ch sp, ch5, sk next dc- 1ch sp - dc, sc in next 1ch sp, rep * around, 7dc in next 5ch sp, end w/ sl st in 1st sc to join.
Round 2: Sl st in each of next 2 sts of next 5ch sp, ch1, sc in the same sp, (ch5, sc in next 5ch sp) twice, dc in each of next dc's, * sc in next 5ch sp, (ch5, sc in next 5ch sp) twice, dc in each of next dc's, rep * around, end w/ sl st in 1st sc to join.
Round 9: Sl st in each of next 2 sts of next 5ch sp, ch1, sc in the same sp, [ (dc, picot, ch1) 3 times, dc] in next sc, sc in next 5ch sp, *(dc in next dc, picot, ch1) 6 times, dc in next dc, sc in next 5ch sp, [ (dc, picot, ch1) 3 times, dc] in next sc, sc in next 5ch sp, rep * around, end w/ sl st in 1st sc to join. Fasten off.
Shoulder Strap
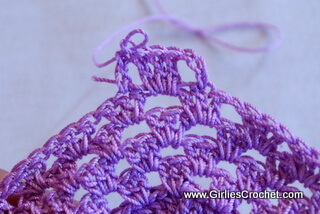
Using wood violet thread, single strand, facing RS to you, attach thread on second cup, in 2nd dc of 3dc set on right side, as shown in the photo below.
Round 1: Ch3, sk next dc, 3dc in next 1ch sp, sk next dc, dc in next dc.
Round 2 - 53: Ch3, turn, sk next dc, 3dc in next dc, sk next dc, dc in next dc.

At the back, from the center 3dc's, sk 4 - 3dc's backwards, use tapestry needle to attach the strap in next 3dc's.
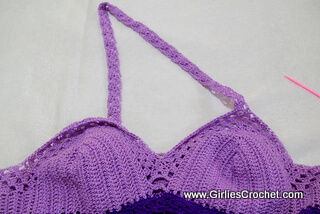
For second strap, repeat the shoulder strap instructions, from previous joined strap, sk 9 - 3dc's, attach the 2nd strap in next 3dc's using tapestry needle.
Shoulder Strap Edging
From last strap you attach, sk next 4 - dc's, attach wood violet thread in next sp,
Round 1: Ch3 (consider as 1st dc), 2dc in the same sp, *sk next 3dc, 3dc in next 1ch sp*, rep * to * 5 times, dc in next dc (Pic 20), [sk next 3dc, 3dc in next sp] 5 times, **3dc in next dc post, sk next dc post** (Pic 21), rep ** to ** 26 times,

dc in corner sp (Pic 22), rep *to* 8 times, dc in next corner sp (Pic 22), rep **to** 26 times, (Pic 21) rep [ ] 7 times, ch2, sc in next sc, ch2 (Pic 23), rep [ ] 7 times, rep ** to ** 26 times, dc in corner sp (Pic 22), rep *to* 3 times, end w/ sl st in 1st dc to join. Change color to purple.
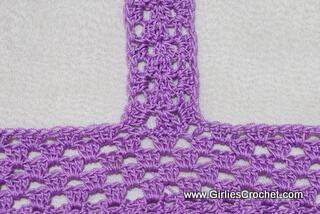
Round 2: sl st in next 2dc and in next sp, change color into purple, ch1, sc - ch3 - 2dc in the same sp, sk next 3dc, *ch1, sc - ch3 - 2dc in sp or dc, sk next 3dc, rep * around. end w/ sl st in 1st sc to join.


Fasten off and weave in ends.
If you would like to support my work as a crochet designer, buy me a cup of coffee.
Stay up to date on Girlies' Crochet . com for free crochet pattern and news related to crochet.
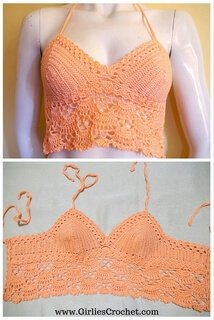
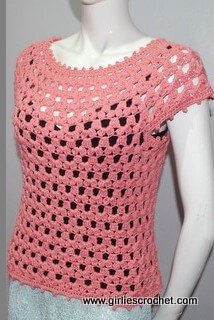
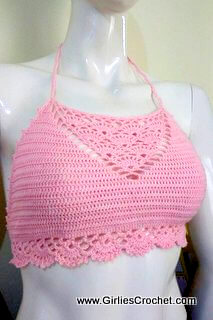
You might also like....


-
-
Girlie's Crochet > Free Crochet Pattern > Bea Crop Top
Recent Articles
-
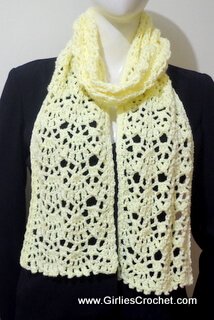
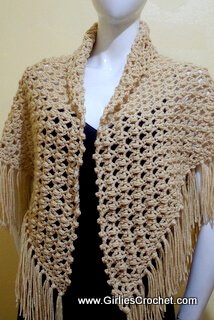
Emma Prayer Shawl
May 16, 25 07:45 PM
 This is a free crochet pattern for Emma Prayer Shawl with photo tutorial in each step. This so simple and easy to create, yet such an elegant design that is sure to complement any outfit.
If you like to support my work as a crochet designer, buy me a cup of coffee.
-
Everything You Need To Build An Online Business - Solo Built It!

)

Popular Free Crochet Pattern

Like us on Facebook
If you like to support my work as a crochet designer, buy me a cup of coffee.
-
Girlie's Crochet and GirliesCrochet.com are © and TM 2013-2024 of Girlie D. de los Reyes .
All rights reserved.
Disclaimer l Privacy Policy l About Me l Home
"BE BLESSED AND BE A BLESSING IN 2025"


New! Comments
Have your say about what you just read! Leave me a comment in the box below.