-
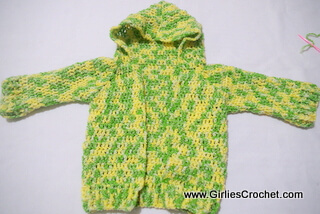
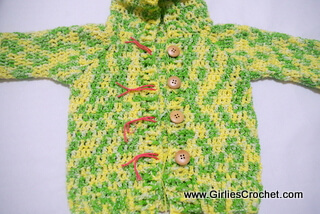
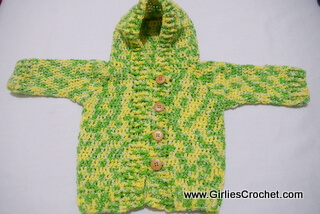
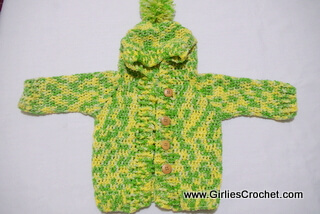
Baby's Hooded Sweater

This is a free crochet pattern for a Baby Hooded Sweater with photo tutorial in each step. For intermediate skill but I made sure that even beginners can crochet by following the step by step guide.
Pattern size is fit for 3-9 months
Finished measurement are
top (hood) to bottom edge 19"
top (shoulder) to bottom edge 10"
body width is 11"
Sleeve length is 7.5"


Skill Level:
Intermediate
(But I think even beginners can crochet this pattern with the help of this photo tutorial)
Materials Needed
Hook: 5.00MM [US H-8]
Yarn: (3) Light/DK
Yarn Used: Bernat Baby Coordinates, Lemon Lime, 500 yds
Tapestry Needle: For weaving ends
Stitch Markers
4-5 Buttons
Pompom maker
Terms Used
All terms are in USA terminology
Ch: Chain, Sc: Single Crochet, Dc: Double Crochet, Fpdc: Front Post Double Crochet, Bpdc: Back Post Double Crochet, Sl st: Slip Stitch, Sk: Skip, Rep: Repeat
Stitch Guide:
Shell st (sh): 2 dc , ch 1, 2 dc
Fpdc: Yarn over, insert hook from front to back to front around post of specified st and draw up a lp, yarn over and draw through 2 loops on hook, yarn over and draw through remaining 2 lps on hook. For photo tutorial please click here.
Bpdc: Yarn over, insert hook from back to front to back around post of specified st and draw up a lp, yarn over and draw through 2 loops on hook, yarn over and draw through remaining 2 lps on hook. For photo tutorial please click here.
Dc2tog: (Yarn over the hook, draw up a loop in next dc, yarn over the hook, draw through first 2 loops on hook) 2 times, Yarn over the hook, draw through all 3 loops on hook: dc2tog made.
Dc3tog: (Yarn over the hook, draw up a loop in next st, yarn over the hook, draw through first 2 loops on hook) 3 times, Yarn over the hook, draw through all 4 loops on hook: dc3tog made.
Gauge:
2” square– 8sts x 4 rows of DC
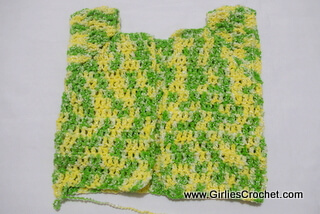
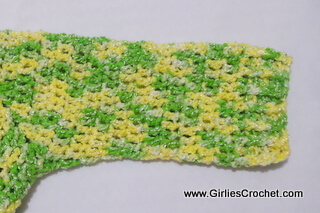
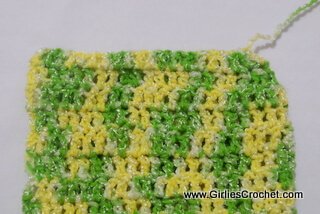
Baby Hooded Sweater Instructions (Body)
Row 1: Ch 54, dc in 4th ch from hook, dc in each of next 4 dc, sh in next st, dc in each of next 10 dc, sh in next st, dc in each of next 15 dc, sh in next st, dc in each of next 10 dc, sh in next st, dc in each of remaining sts. [63 dc]
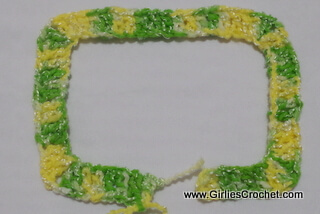
Row 2: Ch 3 (consider as 1st dc here and throughout the pattern), turn, dc in each of next dc across the rows and having sh over 1 ch sp. [79 dc]
Row 3-5: Rep row 2 but doing 16 sts increase in each row. Last row total of 127 dc.
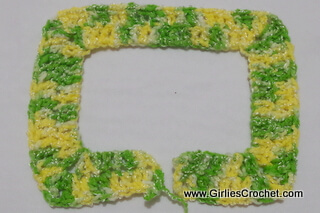
Row 6: We will start on forming the body. Ch 3, turn, dc in each of next 15 dc, dc in next 1 ch sp, dc in next 1 ch sp to join in next corner, dc in each of next 35 dc, dc in next 1 ch sp, dc in next 1 ch sp to join in next corner, dc in each of next remaining dc. [71 dc]
Row 7-19: Ch 3, turn, dc in each of next dc across.
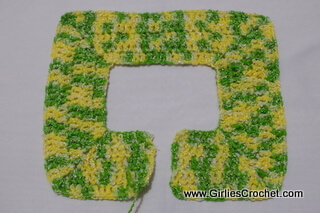
Row 20: We will start forming the body edging. Ch 3, turn, (fpdc in next dc, bpdc in next dc) across, dc in last dc.
Row 21-22: Ch 3, turn, (fpdc in next dc, bpdc in next dc) across, dc in last dc. Fasten off.
Baby Hooded Sweater Instructions (Sleeve)
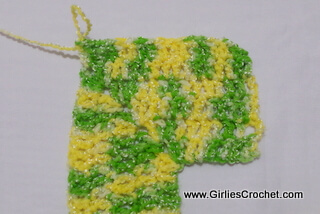
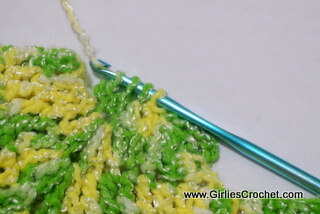
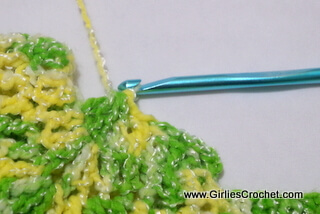
Both arms: Attach yarn at the back part of the sleeve, at the dc post as shown on photo below.
Round 1: Ch 2, dc in the same dc post, dc in each of next 30 dc, dc2tog in next dc post, sl st in 1st dc to join. [32 sts]
Round 2: Ch 2, dc in each of next 28 dc, dc2tog in next dc and dc2tog, sl st in 1st dc to join. [30 sts]
Round 3: Rep round 2 but having 28 sts.
Round 4-11: Ch 3, dc in each of next sts around, sl st in 1st dc to join.
Round 12-14: Ch 3, (fpdc in next dc, bpdc in next dc) across, dc in last dc. Fasten off.
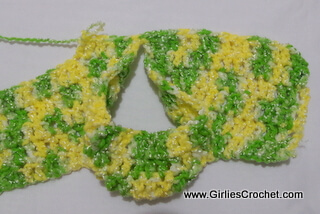
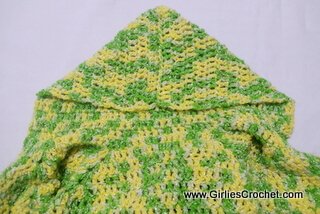
Baby Hooded Sweater Instructions (Hood)
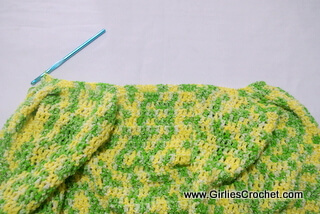
Attach yarn at the upper part of the sweater, as shown on photo below.
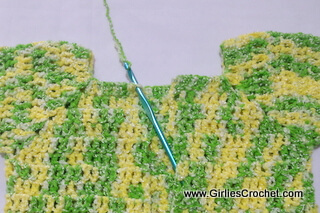
Row 1: Ch 3, dc in each of next dc across but use dc3tog in 4 corners. [43 dc]
Row 2-15: Ch 3, turn, dc in each of next dc across

Row 16: Ch 3, turn, dc in each of next 18 dc, dc2tog in next 2 dc, dc in next dc, dc2tog in next 2 dc, dc in each of next 19 dc. [41 dc]
Row 17: Ch 3, turn, dc in each of next 18 dc, dc3tog in next 3 sts, dc in each of next 19 dc. [39 dc]
Leave 10" tail, cut off. Use tapestry needle to close the hood.
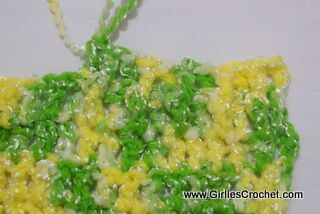
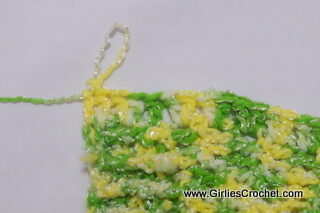
Baby Hooded Sweater Instructions (Edging / Button)
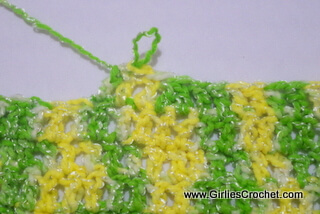
Attach yarn at the side bottom part left front of the sweater, as shown on photo below.
Row 1: Ch 3, dc in next dc post, 2 dc in next dc post, dc in next dc post, (2 dc in next dc post) 72 times, dc in next dc post, 2 dc in next dc post, dc in next dc post, dc in corner st.

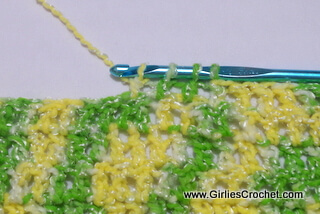
Row 2: Ch 3, (fpdc in next dc, bpdc in next dc) across, dc in last dc.
Now, get stitch marker (I used piece of yarn as marker), Start from the neck, count 2 fpdc downward, put the marker in next bpdc, then put other marker in every 4th bpdc. Try to lay down the button to get the idea of how it looks like. If however, you are not happy, you can adjust the stitch marker according to your desired length or distance.
Row 3: Ch 3, (fpdc in next dc, bpdc in next dc) across, but having ch 10 sl st in top of fpdc where your bpdc marker is, dc in last dc.

Row 4: Ch 3, (fpdc in next dc, bpdc in next dc) across, dc in last dc. Fasten off.
Lay down the sweater (aligned with the stitches), attach button in 2nd row on the corresponding side.
Optional:
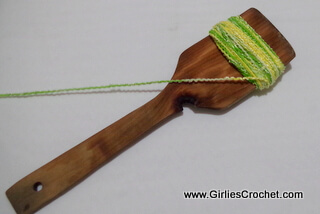
Baby Hooded Sweater Instructions (Pom pom)
I made my pom pom using this old wooden spatula.
I just wrapped around until desired fluff was achieved. You may add to increase fluff to your satisfaction. Use a long piece of yarn to tie off and make sure to leave yarn allowance for attaching the pom pom to the hood. Trim edges to desired shape
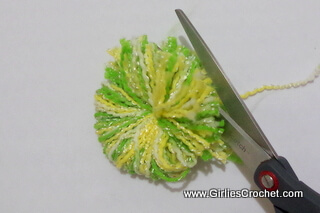
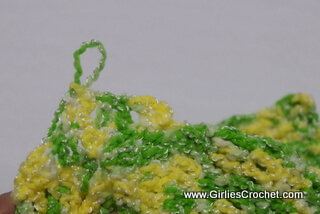
Attach pom pom at the corner of your Baby crochet Hooded Sweater.

Use tapestry needle to weave all ends.
You might also like....

If you would like to support my work as a crochet designer, buy me a cup of coffee.
Girlie's Crochet . Com This free newsletter is delivered monthly, straight to your INBOX.
It covers all new pages since the last issues. Sign up here....
|
|
-
-
Girlie's Crochet > Free Crochet Pattern > Baby Hooded Sweater
Recent Articles
-
Emma Prayer Shawl
May 16, 25 07:45 PM
 This is a free crochet pattern for Emma Prayer Shawl with photo tutorial in each step. This so simple and easy to create, yet such an elegant design that is sure to complement any outfit.
If you like to support my work as a crochet designer, buy me a cup of coffee.
-
Everything You Need To Build An Online Business - Solo Built It!


Popular Free Crochet Pattern


Like us on Facebook
If you like to support my work as a crochet designer, buy me a cup of coffee.
-
Girlie's Crochet and GirliesCrochet.com are © and TM 2013-2024 of Girlie D. de los Reyes .
All rights reserved.
Disclaimer l Privacy Policy l About Me l Home
"BE BLESSED AND BE A BLESSING IN 2025"


New! Comments
Have your say about what you just read! Leave me a comment in the box below.