-
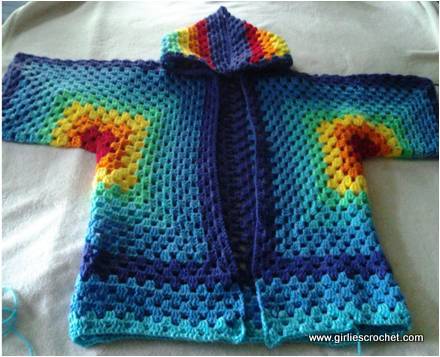
Hexagonal Hooded Cardigan

Celeste Wood - Florida , USA
This design is made of 2 hexagonal grannies, joined together to form the body and sleeves, and adding a hood while lengthening the sleeves to desired and bottom to desired length. It’s a very simple concept that any level of skill can grasp and mold to their liking.
There are plenty of tutorials all over the internet and YouTube for cardigans of this type in various forms. Some with collars, some without, some with hoods and sleeves that are cuffed. This was made from a picture seen on the internet.
The size of the cardigan is based on the size of your hexagons. This pattern was written on the one I made for my daughter. She was a Sm / Med jacket and size ) pants. Of course hook size will affect the size of your stitch, but the real sizing comes from the size of the hexagons. So there isn’t a real exact pattern but more of a guideline. Especially when it comes to changing colors, it’s really up to you when to change if you are using multiple colors. I will be as exact as I possibly can but feel free to play with the guidelines. It is very easy to put your own twist on this project!!
As far as supplies goes: it is really up to what look you are going for, for example, using a smaller hook ( like a C, D, E ) with a lightweight yarn, like mercerized cotton, will require more rounds to achieve desired size but will give more flimsy, more delicate look and feel to the cardigan than using RHSS (Red Heart Super Saver) and a size H or I hook (like me), which will give it a more bulkier and heavier feel to the cardigan. Again, this pattern allows for A LOT of individual creativity and freedom. SO PLAY AROUND AND HAVE FUN!!
I used what I had in my scrap stash and purchased 2 additional colors. The regular blue and purple in mine was a RHSS 7oz and used them the most and still had yarn leftover. Sorry I cannot be more accurate with the amount of each color.


Materials Needed
Yarn: any color of Red Heart Super Saver ( the size of the above project is for 5 year old toddler, approximately 754.40 yards or 410 grams of Red Heart Super Saver)
Crochet Hook : H/8 - 5.00 MM
Term Used
Ch: Chain
Sl st: Slip Stitch
Dc: Double Crochet
Hdc: Half Double Crochet
RHSS: Red Heart Super Saver
Rep: Repeat
Beg: Beginning
Hexagonal Hooded Cardigan Instructions
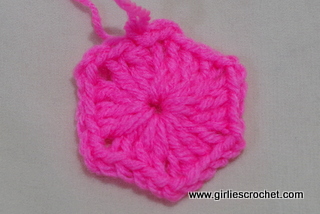
Round 1: Make a magic ring, ch 3 (count as 1st dc throughout the pattern), 2 dc, ch 2, *3 dc, ch 2* rep from *to* 4 more times, sl st in the top of beginning ch 3, sl st in the next dc, sl st in the ch 2 sp.
Round 2: Ch 3, (2 dc, ch 3, 3 dc) in the same sp, ch 1, *(3 dc, ch 3, 3 dc) in next 2 ch sp, ch 1*, rep from *to* 4 more times, sl st in top of beg ch 3, sl st in next 2 dc, sl st in next 2 ch sp. (If you are using multiple colors, change color with sl st so your beg ch 3 of next round is of the new color. Otherwise, carry on as you have been).
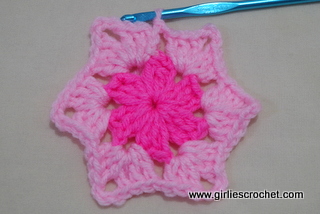
Round 3: Ch 3, (2 dc, ch 3, 3 dc) in 3 ch sp, ch 1, 3 dc in next 1 ch sp, ch 1, *(3 dc, ch 3, 3 dc) in next 3 ch sp, ch 1, 3 dc in next 1 ch sp, ch 1*, rep from *to* 4 more times, sl st in top of beg ch 3, sl st in next 2 dc, sl st in next 3 ch sp.
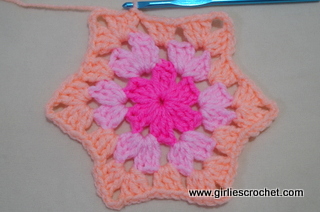
Now, you’re basically just repeating this every round. Always doing the (3 dc, ch 3, 3d c) in every corner, 3 dc in every ch 1 space along the sides and ch 1 between each of them. Go around until you get to the desired size, using sl st in top of the beg ch 3 to complete the round. Fasten Off. Make another Hexagon.
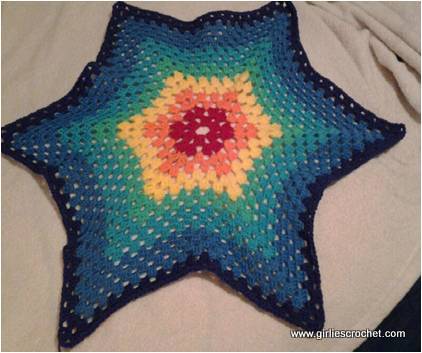
The hexagon will not lay perfectly flat. That is to be expected. In order to fold it into half of the cardigan body, take the middle side corner and fold it across to the middle side corner. Straighten out and line up the edges and it should look like this:

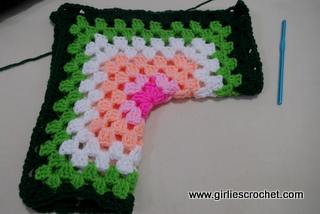
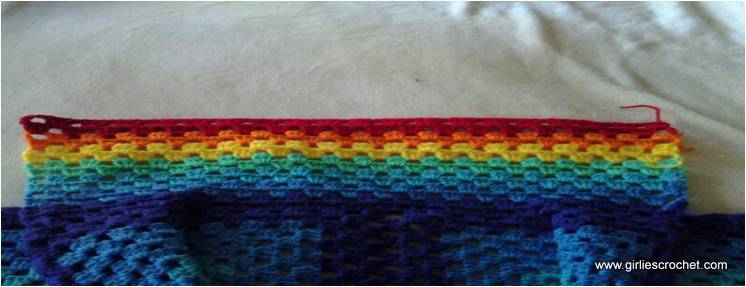
Note: When using multiple colors, keep in mind that your outer most color will be joined together. The joining method will automatically add 2 more rows of that color. As you can see, I only did 2 rounds of Purple (which looks like navy in this picture) because there’s 2 rounds on the other hexagon plus the joining 2 rows will end up giving me a total of 6 rows of purple. As seen below.
Note: When using multiple colors, keep in mind that your outer most color will be joined together. The joining method will automatically add 2 more rows of that color. As you can see, I only did 2 rounds of Purple (which looks like navy in this picture) because there’s 2 rounds on the other hexagon plus the joining 2 rows will end up giving me a total of 6 rows of purple. As seen below.
To join the back of the Hexagons (with wrong sides facing each other and working along joining edge)
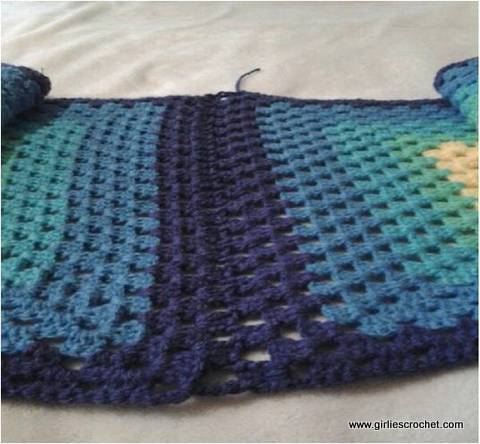
If you do not want to attempt the seamless joining method, you have the option of sewing it together, but it will change the overall look and feel of the cardigan. The seamless method is very easy to do and as you can see, it gives a wonderful finished look, It will appear like the join along the bottom and top edge is just a touch off, but it will go away when you do the lengthening and hoodie.
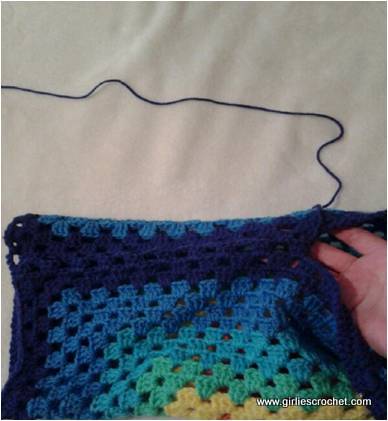
Attach your yarn in one bottom corner of your cardigan (should be a chain space) Ch3, 3DC in the Chain space of the other hexagon, 3DC in the next chain space of previous hexagon. Continue working in a back and forth pattern between the two hexagons up the back of the cardigan until the last 2 chain spaces. 3DC in the next Ch space, DC in the last chain space, Again, don’t worry if it looks slightly wonky. When you do the next Row of Granny stitches, you won’t see it.
To close up the sleeves
This is the same concept as the back, joining the yarn in the corner of the wrist, which should be a chain space. Ch3, 3DC in the first chain space of the opposite side, 3DC in next Chain space of the previous side, (1st picture) continue up the sleeve towards the neckline stopping at the 4th granny stitch from the end of the FRONT piece. (2nd pic) Continue working the FRONT PIECE ONLY with Ch1, 3DC in the next Chain space across to the last Chain space, ending with a DC in the last chain space. Fasten off. Repeat for the other sleeve.
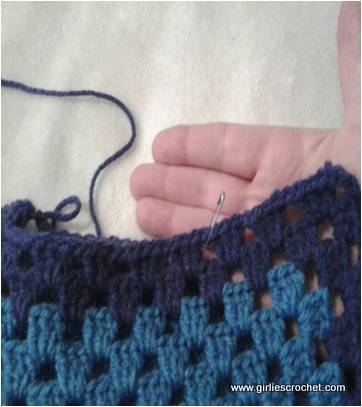
I used a safety pin to remind me where I start working the front piece only.
Making the Hood
The
neckline is worked in a back and forth progression. Join the yarn at the top
left front corner of the body
Round 1: (Ch3,2DC) in the same Ch Sp, *Ch1, 3DC in the next Ch sp*
, rep * to * across to the last ch sp, TURN.
Round 2: Ch4, 3DC in the next Ch sp, *Ch1, 3DC in the next Ch sp*, rep from * to * across to the last ch Sp, TURN.
Round 3: Rep round 2 until you are 4 rows from desired size. If you are using multiple colors, end on a color that is NOT your border color (the last color you will use before the black trim)Fasten off.
Finishing border around body and additional length
The next part will complete your hood (before closing it shut with the seamless join) and the border around the body before additional length is added. If you are looking for a cropped or shorter look, you may not need to work any additional length and can move on to the sleeves.
Join the yarn at the bottom left front corner with the border color. Working towards the neckline, (ch3, 2dc) in the same ch sp, *ch1, 3dc in the next ch sp*, Rep from * to * all the way up to the front towards the corner of the Hood. Keep in mind, where the Hood and neckline meet your 3dc clusters will be next to each other, but no worries, it will not be noticeable due to the fold of the hood.
As you approach the corner of the hood, 3dc in the last ch sp before the corner, ch4, sl st into the 1st dc from the hook, ch4, 3dc in the next ch sp, ch 1, continue across to the next corner, 3dc in last ch sp, ch4, sl st in the top of the last dc of the previous row, ch4, 3dc in the next ch sp, ch1, 3dc in the next ch sp.
Continue down the side of the hood and front of the cardigan. When you reach the bottom right corner – do the traditional (3dc, ch3, 3dc) in the ch sp to form the corner, then continue with the ch1, 3dc in the next ch sp until you reach where you joined. 3dc in the last ch sp, ch3, sl st in the top of starting ch3 to form the corner. If satisfied with the length of the cardigan, Fasten Off.
Otherwise, turn and work the pattern back and forth along the bottom of the cardigan like the hood, until you reached desired length, changing colors when and if necessary. Then Fasten Off.
Closing the Hood
(same concept as closing the back)
Join the yarn at the sl st at the left corner of the hood. Bring the corners together to work back and forth between the two sides. Ch3, 3dc in the ch4 sp of the opposite side of the hood, 3dc in next ch1 sp of left side, continue to point of hood, sl st in next stitch to flatten down the cluster and fasten off.
Lengthening the Sleeves
(this part will be worked in round)
Join the yarn in the ch3 used to join the sleeve together from earlier.
Round 1: (Ch3, 2dc) in the same ch sp, ch1, *3dc in next ch sp, ch1*, rep from * to * around, sl st in top of beginning ch3, sl st in next ch sp.
Round 1: Rep round 1 until you reach your desired length, sl st in top of beginning ch3, to close the round.
Last Round: When you have reached the length you want, ch2 (counts as 1st hdc), hdc in every dc and ch sp around, sl st in top of ch2 to close round. Fasten off and weave in end.
I wanted to try the following to give the sleeve a more closed finish but my daughter wanted to open wide cuff. I am going to give you my idea but I haven’t been able to test it as of now. I plan on doing it to the next one I make and will edit this pattern when I do. So here is what I was thinking……
Cuffs for the Sleeves
If you choose to make the cuffs, I think you should do them in place of the hdc’s. The cuff is worked in the round.
Round 1: Do one more round of granny stitches only NO CH1 IN BETWEEN, sl st to join the round.
Round 2: Ch3 (counts as 1st dc), *( skip 1dc, dc in the next dc*, rep from *to* around the cuff, sl st in the top of the beginning ch3.
Round 3: Ch3, *FPDC, BPDC*, rep from *to* around the cuff, sl st in the top of the beginning ch3.
Repeat round 3 about 8-10 times. The FPDC will always be worked into the previous FPDC; BPDC will always be worked into the previous BPDC.
Remember I am guessing here as I have not yet tried this out myself. Just go around until it looks right to you. It should taper down, narrowing the whole. If you want to get real creative with it you could change colors every couple of rounds but change with the closing sl st so your beginning ch3 is with the new color. Fasten off and weave in end. Repeat for the other sleeve.
Finishing the body's trim
With the yarn, join in the bottom left corner of the cardigan (chain space), ch2 (count as first hdc), hdc in every dc and chain space around until you have reached the beginning ch2, sl st in top of the beginning ch2. Fasten off and weave in ends.
These are the pictures that inspired this project. When mine is completed it will be included in the edited version. J


If you would like to support my work as a crochet designer, buy me a cup of coffee.
Stay up to date on Girlies' Crochet . com for free crochet pattern and news related to crochet.
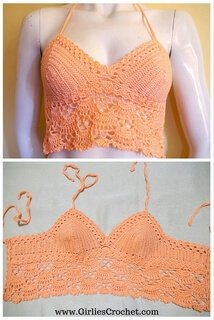
You might also like....

-
-
Girlie's Crochet > Free Crochet Pattern > Hexagonal Hooded Cardigan
Recent Articles
-
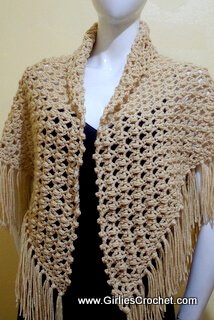
Emma Prayer Shawl
May 16, 25 07:45 PM
 This is a free crochet pattern for Emma Prayer Shawl with photo tutorial in each step. This so simple and easy to create, yet such an elegant design that is sure to complement any outfit.
If you like to support my work as a crochet designer, buy me a cup of coffee.
-
Everything You Need To Build An Online Business - Solo Built It!


Popular Free Crochet Pattern


Like us on Facebook
If you like to support my work as a crochet designer, buy me a cup of coffee.
-
Girlie's Crochet and GirliesCrochet.com are © and TM 2013-2024 of Girlie D. de los Reyes .
All rights reserved.
Disclaimer l Privacy Policy l About Me l Home
"BE BLESSED AND BE A BLESSING IN 2025"


New! Comments
Have your say about what you just read! Leave me a comment in the box below.