-
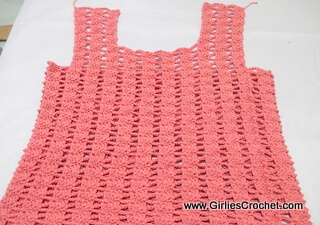
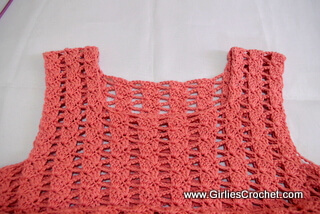
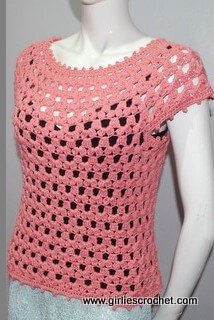
Carla Summer Top

This Carla Summer Top is an easy free crochet pattern perfect for beginners. This is as simple as a pattern gets, it is only one round repeated all through the pattern.
I used Sidesaddle Cluster Stitch in this Summer Top but having 3 dc instead of 4 dc.


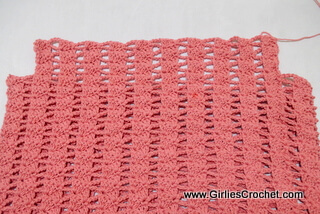
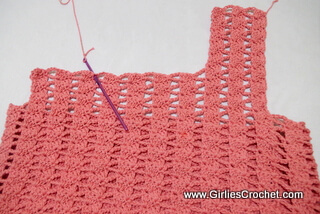
This Summer Top is worked in round from bottom up. When you get to the armpit, you start on the right front panel to the top of shoulder, and then you start on the left front panel to the top. After the front panels, you then create the back panels after which you then join them to each other to create the shoulders.
Laying flat size: Width 18” X Length 20” (for Small size only)
Foundation Chain: Multiples of 7
Instructions for different sizes available are in [bracket] -
S [M, L, XL, XXL]. Width sizes are in 18" [19 1/2 ", 21", 22 1/2", 24"]
Materials Needed:
Yarn Weight: Light DK weight cotton
Yarn: South Maid Cotton 8 (Crochet Yarn) / Coral / 3 1/4 Skeins / 340 grams
Hook size: 4.00 MM [US G-6]
Terms Used:
All terms are in USA terminology
Ch: Chain, Sc: Single Crochet, Dc: Double Crochet, Hdc: Half Double Crochet, Lps: loops, Sl st: Slip Stitch, Sp: Space, Sk: Skip,
Gauge
9 sts X 4 rows = 2 inches in dc
Carla Summer Top Body Instructions
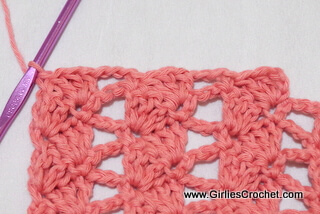
Round 1: Ch 168 [182, 196, 210, 224], sl st in 1st ch to form a ring, ch 3 (consider as 1st dc), 2dc in the same st, sk next 2 ch, sc in next ch, ch 3, sk next 3 ch, *3 dc in next ch, sk next 2 ch, sc in next ch, ch 3, sk next 3 ch, rep * around, end w/ sl st in 1st dc to join. (24 [26, 28, 30, 32] – 3dc set)
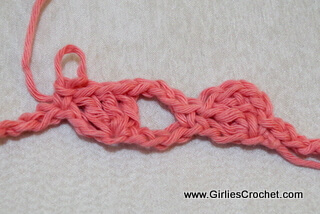
Round 2: Ch 1, turn, sc in the same st, ch 3, sk next 3 ch sp, 3 dc in next sc, sk next 2 dc, *sc in next dc, ch 3, sk next 3 ch sp, 3 dc in next sc, sk next 2 dc, rep * around, end w/ sl st in 1st sc to join.

Round 3: Ch 3 (consider as 1st dc), turn, 2dc in the same st, sk next 2 dc, sc in next dc, ch 3, sk next 3 ch sp, *3 dc in next sc, sk next 2 dc, sc in next dc, ch 3, sk next 3 ch sp, rep * around, end w/ sl st in 1st dc to join.
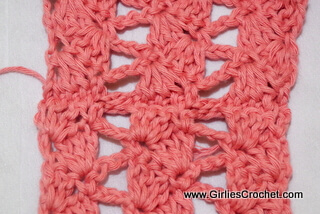
Round 4 - 34 [36, 38, 40, 42]: Repeat round 2 and round 3, end w/ round 2, continue to front panel.

Front Panel Instructions
Row 1: Ch 3 (consider as 1st dc), turn, 2dc in the same st, sk next 2 dc, sc in next dc, *ch 3, sk next 3 ch sp, 3 dc in next sc, sk next 2 dc, sc in next dc, rep * 8 [9, 9, 10, 10] times more, end w/ sl st in 1st dc to join. (10 [11, 11, 12, 12] – 3dc set)
Row 2 – 6 [6, 6, 6, 6] : Rep row 1, do not cut, continue to right shoulder panel.
Right Front Shoulder Panel
These instructions apply to all sizes
Row 1: Ch 3 (consider as 1st dc), turn, 2dc in the same st, sk next 2 dc, sc in next dc, *ch 3, sk next 3 ch sp, 3 dc in next sc, sk next 2 dc, sc in next dc, rep * once more, (3 [3, 3, 3, 3] – 3dc set)
Row 2 – 10 [ 10, 10, 12, 12]: Rep row 1, Fasten Off.
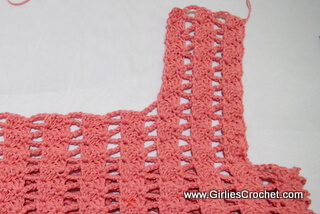
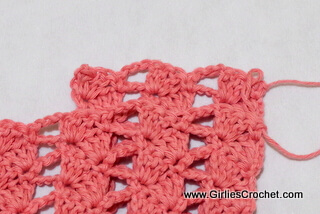
Left Front Shoulder Panel
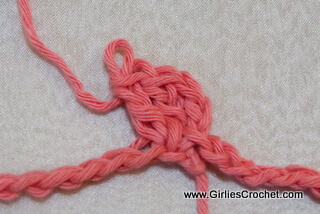
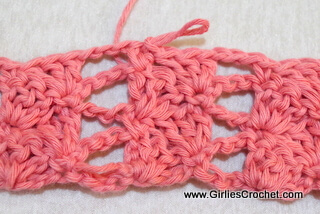
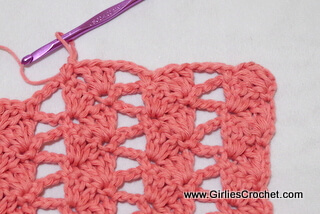
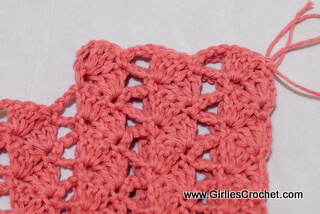
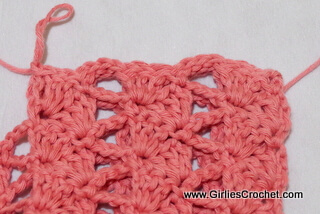
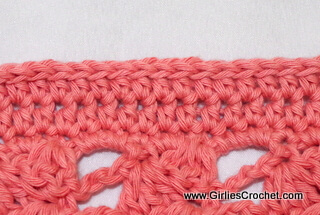
Row 1: Sk 4 [5,
5, 6, 6] sc’s, attach yarn in next sc as shown in the photo below, ch 3
(consider as 1st dc), 2dc in the same st, sk next 2 dc, sc in
next dc, *ch 3, sk next 3 ch sp, 3 dc in next sc, sk next 2 dc, sc in next dc,
rep * once more, (3 [3, 3, 3, 3] – 3dc set)
Row 2 – 10 [ 10, 10, 12, 12]: Rep row 1, Fasten Off.
Back Panel Instructions
From completed front panel, sk 2 [2, 3, 3, 4] sc’s, attach yarn in next sc.
Row 1: Ch 3 (consider as 1st dc), 2dc in the same st, sk next 2 dc, sc in next dc, *ch 3, sk next 3 ch sp, 3 dc in next sc, sk next 2 dc, sc in next dc, rep * 8 [9, 9, 10, 10] times more, end w/ sl st in 1st dc to join. (10 [11, 11, 12, 12] – 3dc set)
Row 2 – 14 [ 14, 14, 14, 14]: Rep row 1, do not cut, continue to right back shoulder panel.
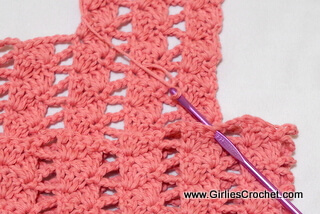
Right Back Shoulder Panel
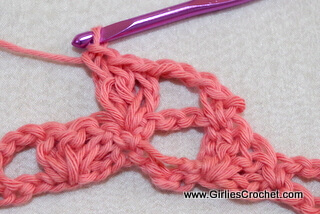
Row 1: Ch 3 (consider as 1st dc), turn, 2dc in the same st, sk next 2 dc, sc in next dc, *ch 3, sk next 3 ch sp, 3 dc in next sc, sk next 2 dc, sc in next dc, rep * once more, (3 [3, 3, 3, 3] – 3dc set)
Row 2 [2, 2, 4, 4]: Rep row 1, do not cut.
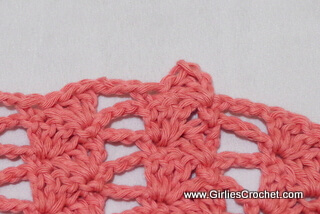
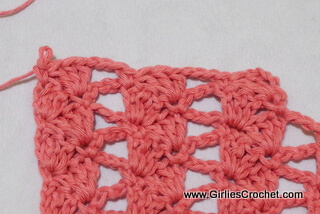
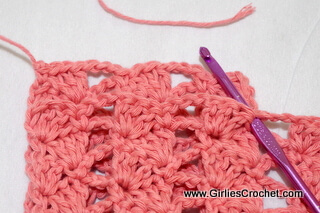
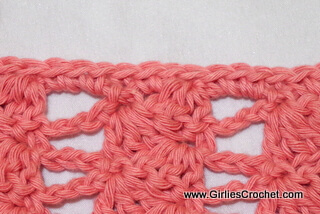
Continue joining this panel to left front shoulder panel using whip st or any st that you are comfortable with. I used sl st in each st across as shown in photo below. Fasten off and weave in ends.
Left Back Shoulder Panel
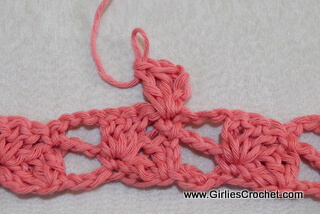
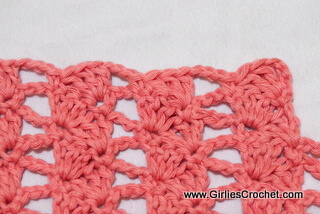
Row 1: Sk 4 [5, 5, 6, 6] sc’s, attach yarn in next sc as shown in the photo below, ch 3 (consider as 1st dc), turn, 2dc in the same st, sk next 2 dc, sc in next dc, *ch 3, sk next 3 ch sp, 3 dc in next sc, sk next 2 dc, sc in next dc, rep * once more, (3 [3, 3, 3, 3] – 3dc set)
Row 2 [2, 2, 4, 4]: Rep row 1, do not cut.
Continue joining this panel to right front shoulder panel using whip st or any st that you are comfortable with.
Fasten off and weave in ends.
Lower Edging
Round 1: Attach yarn in any 3 ch sp, ch 1, 3 sc in the same sp, sc in next st, 2 sc in next 2 ch sp, sc in next st, *3 sc in next 3 sc sp, sc in next st, 2 sc in next 2 ch sp, sc in next st, rep * around, end w/ sl st in 1st sc to join.
Round 2 - 3: Ch 1, hdc in the same st, hdc in each st around and end w/ sl st in 1st hdc to join.

Round 4: Sl st in each st around.
Fasten off and weave all ends.
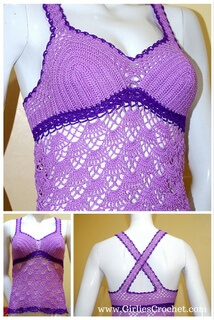
This top can be worn during summer time as cover-up or as vest during winter time. It is casual wear but can be semi formal with a few accessories and slight wardrobe changes or additions.


If you would like to support my work as a crochet designer, buy me a cup of coffee.
Stay up to date on Girlies' Crochet . com for free crochet pattern and news related to crochet.
You might also like....

-
-
Girlie's Crochet > Free Crochet Pattern > Carla Summer Top
Recent Articles
-
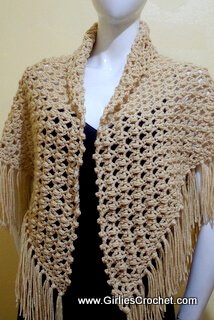
Emma Prayer Shawl
May 16, 25 07:45 PM
 This is a free crochet pattern for Emma Prayer Shawl with photo tutorial in each step. This so simple and easy to create, yet such an elegant design that is sure to complement any outfit.
If you like to support my work as a crochet designer, buy me a cup of coffee.
-
Everything You Need To Build An Online Business - Solo Built It!


Popular Free Crochet Pattern


Like us on Facebook
If you like to support my work as a crochet designer, buy me a cup of coffee.
-
Girlie's Crochet and GirliesCrochet.com are © and TM 2013-2024 of Girlie D. de los Reyes .
All rights reserved.
Disclaimer l Privacy Policy l About Me l Home
"BE BLESSED AND BE A BLESSING IN 2025"


New! Comments
Have your say about what you just read! Leave me a comment in the box below.